Wednesday 29 February 2012

Painting the Helmet


Coinciding with the leap year, this installment illustrates the wet-on-wet approach used to render the Luftwaffe helmet.


To enhance the spread of paint and diffusion of color, the surface is moisturized with a spray of the retarder and water solution before an intermediate highlight color mix of Storm Blue and Titanium White is applied.


Next,  colors complementary to blue were randomly applied in sparing quantities over a moist layer of water and retarder solution.


These colors were swirled around, generating a myriad of tertiary tones.


In part due to the retarder, the paint coagulates to a buttery consistency as it dries. This makes it ideal to employ the feathering(sfumato) technique - accomplished by using a fresh dry brush - in light and gentle strokes - to merge the stark boundaries between the different colors.


The muddy appearance from mixing complementary colors resulted in a lost of chroma and contrast. These qualities were reclaimed by incorporating a few specs Prussian Blue for chroma and Titanium White for contrast and highlight.


Again, the feathering(sfumato) technique was employed to smooth out the transitions along the color boundaries.


Taking advantage of the slow drying, effects of wear and chafe were simulated black paint dabbed with a sponge.


This allows all unsatisfactory areas to be touched up with Storm Blue and blemishes subsequently smoothed out using the feathering technique.


Some processes was repeated over a couple times in the single session before arriving to the satisfactory result. Finally, the helmet decal and Luftwaffe eagle was painted in by hand completing the paintwork for the helmet.

cheers,

Calvin


Monday 20 February 2012

Young Miniatures - Unterfeldwebel, Kampfgeschwader 54, 1940

 .
Moving on to the rest of the bust, the backing for the parachute bag is undercoated with Gunze Sanyo Lacquer-based silver paint.


It is painted with a color mixture of Hookers Green, Cadmium Orange and Carbon Black and set aside to dry.


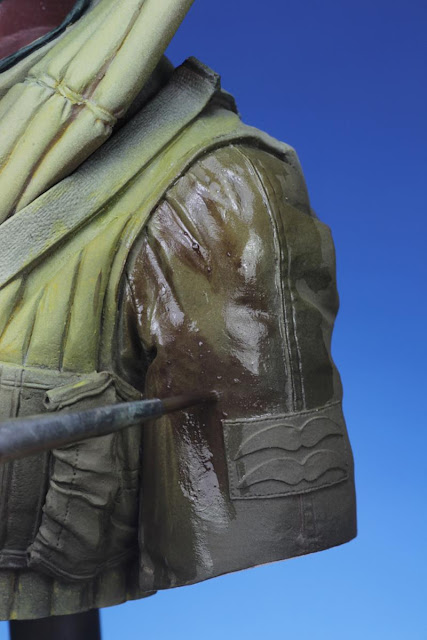
A solution of water and retarder is applied and the chafe effects were created by scratching the paint off with a toothpick.

 
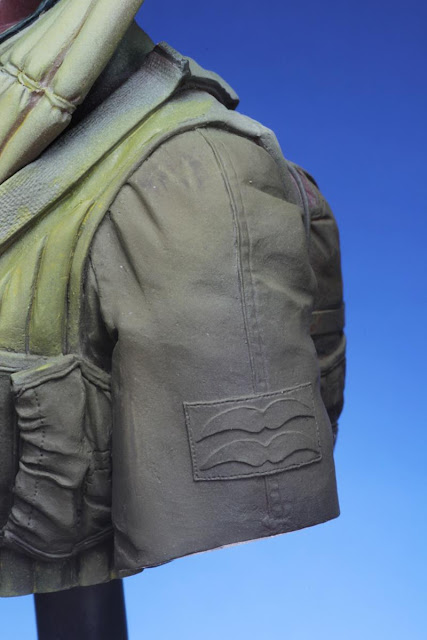
The seams on the sleeves are highlighted with Naples Yellow and deep shadows outlined with a mixture of Hookers Green, Cadmium Orange, Storm Blue and Black. The shoulder patch was undercoated with a mix of Raw Sienna, Earth Brown and Naples Yellow. Storm Blue was added to the mix, providing the colors for shadow.


The gull wings on the shoulder patch are undercoated with a mixture consisting of Naples Yellow, Storm Blue and Titanium White.


The high points of the gull wings are highlighted with Titanium White, completing the painting of the shoulder patch.

The Sfumato technique was employed to mediate the stark boundaries between intermediate colors. The diffused effect is achieved by evenly "scrubbing" on a very small amount paint across the surface producing a soft and faint impression of the color. This is relatively easier to accomplish with oils with its slow drying and thicker paint body.
With acrylics, the drying is prolonged with the addition of the paint retarder. The retarder also coagulates the paint as it dries, giving it the thick buttery paint body ideal for this purpose. 


The surface is prepared with a retarder and water solution.


Next, a small amount of intermediate shadow color is brushed on and worked around in a scrubbing motion, producing a cloud like effect.


 The same procedure follows towards the application of the highlights. 


The parachute harness was painted with a mix of Raw Sienna, Naples Yellow, Hookers Green and Titanium White. Subtle tonal variations are created with light washes of Earth Brown and Storm Blue. 


Cheers,

Calvin


Friday 17 February 2012

DIY Decals

.
One day while printing some family pictures on my Canon Selphy printer did I realize that this printing method could be used to create to custom decals. I deducted that since the ink is not printed directly on the paper, but rather on a thin cellophane-like paper laminate, it could be lifted out like a water slide decal. I decided to put to test this hunch and arrived to the following outcome.


The inscriptions were created on Photoshop and printed with the Canon Selphy printer on their proprietary postcard paper. A water brush pen loaded with a solution of water and retarder was used to wet the surface to position the cellophane film before affixing it with Vallejo gloss varnish.


The printed cut-out was soaked in water for about an hour to separate the cellophane film from the paper. My deduction proved correct as the print was made onto the cellophane film instead of the paper and thus the Canon Selphy postcard print works exactly like a regular water-slide decal.

The film is positioned with a pair of tweezers and brush and affixed with a water-based gloss varnish from Vallejo. Excess film is trimmed with a scalpel blade and irregularities touched up with silver paint.

The main drawback I conclude is that the CMY print cartridge of the Selphy printer does not print black - making the darkest tones appear as a very dark blue. Needless to mention, CMY printing does not print white - which means that this will have to be filled in by hand.  Considering the type of quality for that inexpensive cost of print and the added convenience of doing it from your home computer, I must comment that the result is still rather delightful. Do give this a try and let me know what you guys think.

Until next time...

Calvin


Wednesday 15 February 2012

Young Miniatures - Unterfeldwebel, Kampfgeschwader 54, 1940

.
The project gets more headway as the aluminum parts are hand painted from silver paint extracted from Tamiya silver paint marker. Preliminary highlights and shadows are rendered for the right arm and the kapok vest.


Attaining value contrast has generally been my preference towards painting the smaller scale figures. Working on a larger 1/9 scale allows more latitude to introduce a wider range of colors due to the increased surface area which would otherwise be limited on a 1/35 scale figure. There are many rationals to this application - of which elemental effects such dirt, stains, etc... seems to be widely practiced. However, the full effects of lighting and shadows are often left unexplored. The convenient color choice of highlights and shadows is based on its value against the local color. If the local color is green, the colors of the highlights and shadow will be respectively that of light green and dark green. This is the most straightforward approach to yield contrast.  However, because this mode of painting does not represent the true nature of light -in spite of the fine rendering - the result appears stark and artificial. 

It is imperative to know that shadows do not imply an absence of light but just a lack of it (as more clearly explained in this article).  It is a different quality of light produced by the intensity and source of the  illumination. I reflected this different quality with a subtle glaze of blue-green into the deepest shadows of the figure instead of the stark raw umber or black wash.

The following pictures reveal the unflattering breakdown of the kit's components and how the incorporation of magnetic interfaces assist in the painting and alignment of the individual parts.


The right arm is painted separately so as to facilitate the painting of the intricately sculpted zipper, seams and rank patch.


The flying helmet was depicted in red brown leather -rather than the commonly seen canvas variant - according to Mike Good's wishes. And I have to agree that it does lend a nice contrast to the predominantly yellow scheme. 


The highlights to the kapok vest was glazed on with a mix of Light Yellow and Naples Yellow.


Stronger highlights were established with repeated glazes of Light Yellow and Naples Yellow.


The lower regions - distant from the overhead light source - were glazed with an light olive color mixed from Light Yellow, Cadmium Orange and Hookers Green.


The deep recesses were lined in with a mix of Earth Brown, Carbon Black and Hookers Green.


Finally, a light wash mixture of black, yellow and blue was applied to simulate shadows on the aluminum areas.

In the next posting I will reveal a little secret technique I discovered for making the inscriptions on the parachute buckle.

Calvin


Saturday 11 February 2012

Figure Painting a la Bob Ross

.
In this installment, I will cover the alla prima procedure for wet-on-wet painting using acrylic paints.


Prepare the paint surface with by applying the water and retarder solution with a water brush. This enhances paint control, contour diffusion and more importantly prevents overlaying colors from staining by saturating the porous matte base.


I always recommend applying the intermediate shadow color first. This color is conceived from the immediate value darker than that of the local color.


Reckoning that chroma and color warmth will be lost when mixed with the shadow color,  a stronger tone of yellow mixed from Light Yellow, Naples Yellow, Raw Sienna and a touch of Cadmium Orange was applied. 


The local color with an orange bias was also applied as another intermediary tone to the strong yellow and dark brown. There are no hard and fast rules to this. 


Highlights were added with a dash of Naples Yellow. These colors are then carefully merged together along their boundaries. 
 "Just lightly blend it, one hair and some air" 
Bob Ross


Build up  opacity through increments of thin paint and spread it out evenly in light and gentle  strokes to reduce the appearance of brush strokes.

"Remember our Golden Rule: A thin paint sticks to a thick paint."
Bob Ross


You can enhance the variation of hues by adopting a variation of the "broken color" technique pioneered by the impressionists. Instead of leaving the pure color as they are, I incorporated them together to produce subtle variations of tertiary hues. Most will recall prominent armor modelling guru Miguel "MIG" Jimenez pioneering this technique for armor models.

"You can put as many or as few as you want in your world"
Bob Ross
 

The result from the first session of painting. The alla prima technique - though lacking in finesse as shown by the loose handling of paint - it nonetheless allows a rapid realization of value contrast and color tones. 

Cheers,

Calvin